How to Make A Door Desk For $100
It's not as ghetto as it sounds!
When I moved into my new apartment in Texas, I had no furniture at all. Unless you count my desk chair. The thing that irritated me the most about my situation was not having a desk. I looked all over for a desk, including antique and thrift stores. There was one at IKEA that came close to what I wanted, but it was just too small and I wasn't sure it could support the weight of my monitor. It cost $150.
Alissa suggested that I take a door off its hinges and put it on concrete blocks. I informed Alissa that that was the most ghetto thing one could possibly do, and that I should not act like a redneck just because I live in Texas. The solution? Go to a lumber store and make my OWN desk. When I got to the hardware store, I found the perfect piece of wood: it was actually a composite of a bunch of different pieces of wood, but it was large, flat, and looked rather nice. I went to the front and asked how much this mysterious piece of wood was. They had no idea what I was talking about. When I walked them back to see what I wanted, the guy goes "Oooh, that's a door". Fine. It's a door. But no one has to know that. The materials for my new desk cost $100.10, and fits my specifications perfectly.
Materials
- 8 concrete blocks
- 1 solid wood door (mine has a mahogany veneer)
- 1 largeish can of semi-gloss polyurethane (a quart gave me three coats)
- 1 brush or foam roller
- 150 grit sand paper
- paint thinner
Quick Overview
Apply polyurethane to the door, stack concrete blocks, then put door on top of blocks. Brag to friends.
Instructions
This is what my 'desk' looked like before this project. Notice how crappy everything looks.

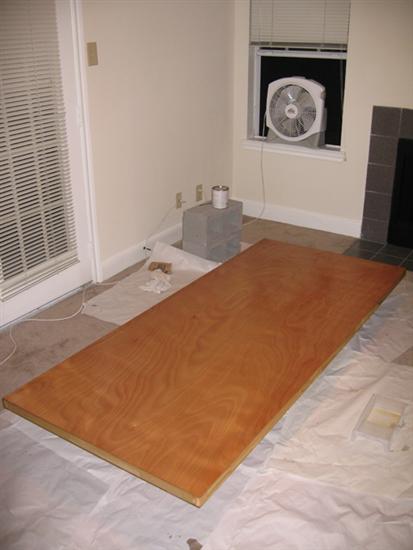
Let's get started. First, I laid down two concrete blocks on some newspaper and put a shirt over them so they wouldn't scratch the door. Then I laid the door down with the best side up. Sand the edges to make everything smooth. The face of the door didn't really need sanding, but I sanded it a little anyway. Mostly, I wanted the corners rounded and the edges smooth.

Coat liberally with polyurethane per the instructions on the can. Don't over brush. The guy at the store told me to use a roller, even though the can said specifically not to use a roller. I think I'd use a wide brush next time, because the roller left little air bubbles in the finish. It's not really noticeable though. Also, the guy at the store suggested I use semi-gloss instead of gloss, and I THINK I'm glad I listened to him. The desk looked really nice when it was still wet, so I'm wondering if a glossy finish would be better. Anyway, let it dry in a place where no bugs or dust will fly into it. Put at least 2 coats on the top; if you have the patience and time, a third coat is probably best. After the top has a few coats and is dry enough, flip it over and put a coat on the back. Don't neglect the sides.
Let this dry overnight. You're about to put heavy stuff on it.
Stack up some concrete blocks however you wish. Nothing is critical here, except to remember that you don't want this desk tipping over if you nudge it. I put one block on its side, and the other standing on top of that on its end. The desk doesn't budge. You could throw someone on this thing and it wouldn’t move. You may want to consider placing a stack of concrete bricks under areas where ultra-heavy things are going to rest. I made the rear blocks closer together toward the center of the desk to support my heavy monitor.
The finished desk:

After I finished it, I thought the concrete blocks make it look pretty ugly. Luckily, I'm getting use to it now. If I had more time/money/tools, I'd buy some large square poles and make respectable legs. But that's the great thing about this: I can always add legs later.